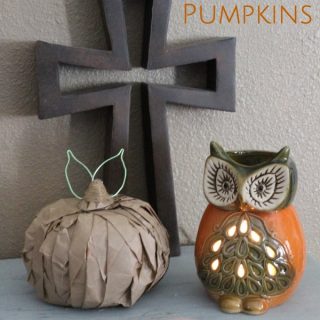
Paper Bag Pumpkins
The paper bag pumpkins are so cute and also make a great staple in your fall decor for years to come. Have an hour to spare? Make these paper bag pumpkins!

The Dollar Tree is my go to place when it comes to making crafts. I love that I can find ways to repurpose items they sell in their stores and still be able to create something awesome without breaking the bank.
Each week, I make at least 2 to 3 trips into my local Dollar Tree searching what’s new in stock so the boys and I can do a little crafting. Last week, they had these cute little foam pumpkins that by themselves would make a great staple in my fall decor. But I knew I could make them look unique and even more festive with only a little effort.
So I searched the aisles and found some brown paper bags, twine, and floral wire and I knew what to do with all of it when I got home!
I created…
Paper Bag Pumpkins!
And you can make them too…check out how to make paper bag pumpkins from the Dollar Tree below!
What you need:
- Hot Glue Gun
- Tons of Glue Sticks (ok, like maybe half a bag) :)
- 6 Brown Paper Bags
- Jute Twine
- Floral Wire (green – 18mm)
- Needle Nose Pliers
- Scissors
How to Make Paper Bag Pumpkins

- Remove the stem from the pumpkin and place it aside for later.
- Cut paper bags into roughly 2-inch strips. (you should get 4 strips per bag and they don’t have to be perfect either)
- Tear bag glue to make one long strip.
- Place a drop of hot glue on the bottom of the pumpkin and set one end of the paper bag onto the glue. Allow it to dry for about 20 seconds or so.
- Twist the bag upwards to the top of the pumpkin where you removed the stem. (there will be about 1/4 of the bag left after twisting)
- Place another drop of glue at the top and stick the paper bag down on it to dry.
- Snip the excess paper bag off at the top.
- Continue the process around the foam pumpkin slowly angling the paper bags around the base of the pumpkin.
- After your pumpkin is fully covered, put your hands around the paper bag to “smush” it down around the foam pumpkin to make sure you have covered every space. If you have orange from the pumpkin showing through, you can add a dab of glue on the side (under the paper bags) to force them to stay in place. (I had to do this a few times).
- Once you have the pumpkin completely covered, place a dab of glue on top and put the stem back in place.
- Wrap jute twine around the stem to cover it completely. You may need to add a little glue as you get closer to the top so it stays in place as you wrap it on top.
- Now that your stem is in place and you have your pumpkin fully covered, take your floral wire and unroll about 8 inches of it out.
- Cut the wire in half so you have 2 equal pieces.
- Fold each piece in half and pinch the top with needle nose pliers.
- Hold the tip of the wire that’s folded and roll out each side to make a leaf shape.
- Place a dab of glue at the base of the stem and set the wire leaf form. Allow to dry and then roll from the middle to the tip up so it semi-curls forward.

It seems like a lot of work, but really this project only takes about 30-45 minutes to make. Plus it makes a cute staple piece for your fall and Thanksgiving decor for years to come!
Happy Crafting!
More Fall Decor Ideas:
Organize Your Home For Fall
Easy Fall Decor Ideas
Be sure to pin this easy fall craft idea for later!
Paper Bag Pumpkins
Materials
- Hot Glue Gun
- Tons of Glue Sticks ok, like maybe half a bag :)
- 6 Brown Paper Bags
- Jute Twine
- Floral Wire green – 18mm
- Needle Nose Pliers
- Scissors
Instructions
- Remove the stem from the pumpkin and place it aside for later.
- Cut paper bags into roughly 2-inch strips. (you should get 4 strips per bag and they don’t have to be perfect either)
- Tear bag glue to make one long strip.
- Place a drop of hot glue on the bottom of the pumpkin and set one end of the paper bag onto the glue. Allow it to dry for about 20 seconds or so.
- Twist the bag upwards to the top of the pumpkin where you removed the stem. (there will be about 1/4 of the bag left after twisting)
- Place another drop of glue at the top and stick the paper bag down on it to dry.
- Snip the excess paper bag off at the top.
- Continue the process around the foam pumpkin slowly angling the paper bags around the base of the pumpkin.
- After your pumpkin is fully covered, put your hands around the paper bag to “smush” it down around the foam pumpkin to make sure you have covered every space. If you have orange from the pumpkin showing through, you can add a dab of glue on the side (under the paper bags) to force them to stay in place. (I had to do this a few times).
- Once you have the pumpkin completely covered, place a dab of glue on top and put the stem back in place.
- Wrap jute twine around the stem to cover it completely. You may need to add a little glue as you get closer to the top so it stays in place as you wrap it on top.
- Now that your stem is in place and you have your pumpkin fully covered, take your floral wire and unroll about 8 inches of it out.
- Cut the wire in half so you have 2 equal pieces.
- Fold each piece in half and pinch the top with needle nose pliers.
- Hold the tip of the wire that’s folded and roll out each side to make a leaf shape.
- Place a dab of glue at the base of the stem and set the wire leaf form. Allow to dry and then roll from the middle to the tip up so it semi-curls forward.