How to Make a Custom Personalized Clipboard for Everyday Use
I officially have the cutest personalized clipboard in town! It’s been my best friend for years, but it definitely needed a makeover…tan just wasn’t cutting it for me anymore. I like color. I like style. I like anything other than Plain Jane colors…so bring on the fun!
While I was shopping earlier this week, I had my handy dandy clipboard with me to make sure I didn’t forget anything and it hit me that the tan had to go away…far, far away! Oh and yes I still use good ole paper and pen for my lists! I haven’t made it to the full digital side just yet! :)
So as I was making my way through the aisle, I found the gold mine…CONTACT PAPER!! And cute contact paper if I say so myself!
I picked my favorite design and rushed home to take my clipboard from blah..to FAB in about 5 minutes!
How to Make a Custom Personalized Clipboard for Everyday Use
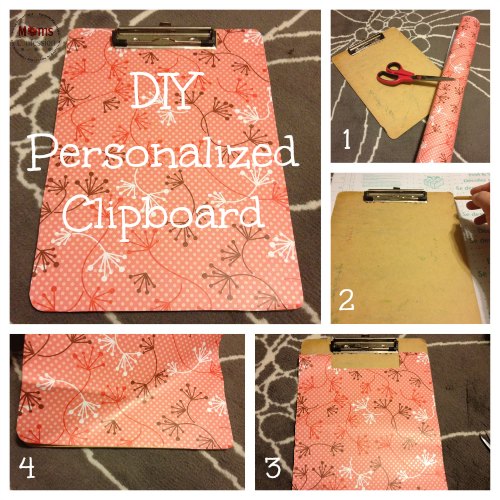
What you need:
- Clipboard
- Contact Paper (any design)
- Scissors
- Pencil
To make your own personalized clipboard:
- Trace the outer edges of the clipboard on the back side of the contact paper
- Cut along the traced lines
- Measure from the ends and cut out the area for the clip
- Remove one corner to reveal the sticky back of the contact paper and place it on the corner of your clipboard
- Slowly remove more of the backing and slowly roll it over the front of the clipboard surface (making sure to remove any bubbles)
Viola! Now you have a super cute clipboard that will have everyone asking you where you got it! And the awesome part is…you can tell them that you made it!! ![]() Now that’s a great feeling!!
Now that’s a great feeling!!
Looking for more craft projects to at home? Check out these other easy tutorials and have fun!!